0.最终效果图
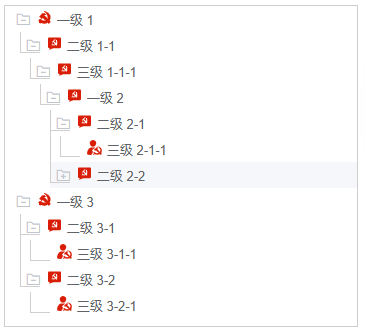
PS:基于ElementUI中的树形控件进行实现
原效果图: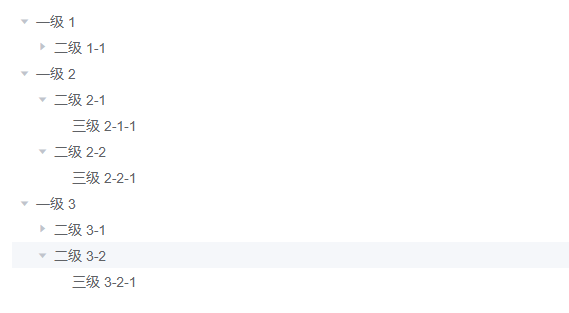
1.实现步骤
分为4各步骤:
- 更换父子节点以及根节点的图标
- 调整父子节点的缩进
- 绘制结点间的关系线
- 更换最前方的小三角形图标
1.1 更换父子节点以及根节点的图标
实现思路:通过data.class的值来确定父子节点和根节点【树形结构的数据中要包含class字段】,分别为其加上不同的图标,图标使用展示。
1
2
3
4
5
6
7
8
9
10
11
12
13
14
15
16
17
18
19
20
| <el-tree
:data="data"
:props="defaultProps"
default-expand-all
indent="0"
class="tree-line"
highlight-current
:expand-on-click-node="true"
@node-click="handleNodeClick"
>
<span slot-scope="{ node, data }" class="custom-tree-node">
<span v-show="data.class === 0" class="iconfont" style="margin-right: 5px"> <svg-icon icon-class="danghui" style="color:#ff0000;font-size:10px;" /> </span>
<span v-show="data.class === 1" class="iconfont" style="margin-right: 5px"> <svg-icon icon-class="dangOrg" style="color:#ff0000;font-size:10px;" /> </span>
<span v-show="data.class === 2" class="iconfont" style="margin-right: 5px"><svg-icon icon-class="dangMember" style="font-size:10px;" /></span>
<span>{{ node.label }}</span>
</span>
</el-tree>
|
1.2 调整父子节点的缩进
1
2
3
4
5
6
7
| .el-tree-node {
position: relative;
padding-left: 5px;
}
.el-tree-node__children {
padding-left: 5px;
}
|
1.3 绘制结点间的关系线
1
2
3
4
5
6
7
8
9
10
11
12
13
14
15
16
17
18
19
20
21
22
23
24
25
26
27
28
29
30
31
32
33
|
.el-tree-node::before {
content: "";
height: 100%;
width: 1px;
position: absolute;
//left: -3px;
top: -18px;
border-width: 1px;
border-left: 1px solid #D1CECE;
}
.el-tree-node:last-child::before {
height: 38px; // 可以自己调节到合适数值
}
.el-tree-node::after {
position: absolute;
content: " ";
width: 20px;
height: 20px;
top: 20px;
border-width: 1px;
border-top: 1px solid #D1CECE;
}
& > .el-tree-node::after {
border-top: none;
}
& > .el-tree-node::before {
border-left: none;
}
|
1.4 更换最前方的小三角形图标
1
2
3
4
5
6
7
8
9
10
11
12
13
14
15
|
.el-tree-node__expand-icon.expanded {
-webkit-transform: rotate(0deg);
transform: rotate(0deg);
}
.el-icon-caret-right:before {
content: "\e783";
font-size: 15px;
font-family:element-icons !important;
}
.el-tree-node__expand-icon.expanded.el-icon-caret-right:before {
content: "\e781";
font-size: 15px;
font-family:element-icons !important;
}
|
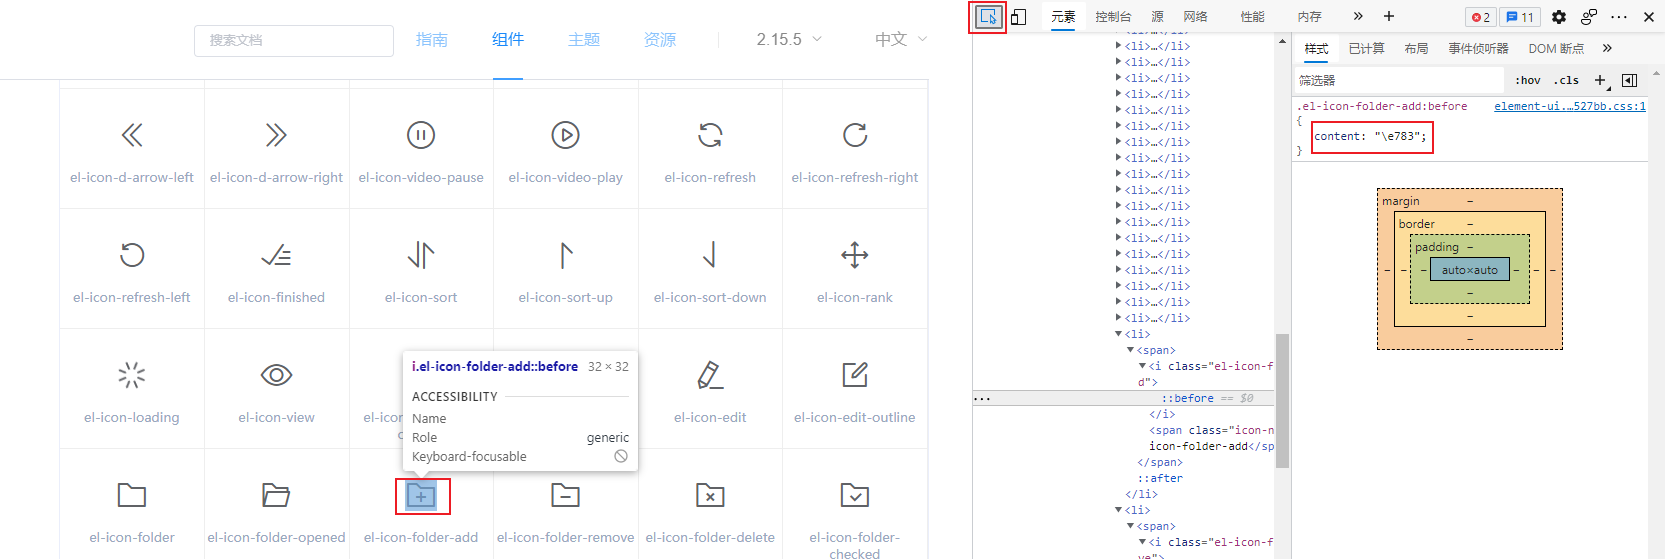
Q:content属性的值如何取到?
A:打开ElementUI图标库,F12选中需要的图标,在样式中即可获取到。
2.完整代码
1
2
3
4
5
6
7
8
9
10
11
12
13
14
15
16
17
18
19
20
| <el-tree
:data="data"
:props="defaultProps"
default-expand-all
indent="0"
class="tree-line"
highlight-current
:expand-on-click-node="true"
@node-click="handleNodeClick"
>
<span slot-scope="{ node, data }" class="custom-tree-node">
<span v-show="data.class === 0" class="iconfont" style="margin-right: 5px"> <svg-icon icon-class="danghui" style="color:#ff0000;font-size:10px;" /> </span>
<span v-show="data.class === 1" class="iconfont" style="margin-right: 5px"> <svg-icon icon-class="dangOrg" style="color:#ff0000;font-size:10px;" /> </span>
<span v-show="data.class === 2" class="iconfont" style="margin-right: 5px"><svg-icon icon-class="dangMember" style="font-size:10px;" /></span>
<span>{{ node.label }}</span>
</span>
</el-tree>
|
1
2
3
4
5
6
7
8
9
10
11
12
13
14
15
16
17
18
19
20
21
22
23
24
25
26
27
28
29
30
31
32
33
34
35
36
37
38
39
40
41
42
43
44
45
46
47
48
49
50
51
52
53
54
55
56
| data: [{
label: '一级 1',
class: 0,
children: [{
label: '二级 1-1',
class: 1,
children: [{
label: '三级 1-1-1',
class: 1,
children: [{
label: '一级 2',
class: 1,
children: [{
label: '二级 2-1',
class: 1,
children: [{
label: '三级 2-1-1',
class: 2
}]
},
{
label: '二级 2-2',
class: 1,
children: [{
label: '三级 2-2-1',
class: 2
}]
}]
}]
}]
}]
}, {
label: '一级 3',
class: 0,
children: [{
label: '二级 3-1',
class: 1,
children: [{
label: '三级 3-1-1',
class: 2
}]
},
{
label: '二级 3-2',
class: 1,
children: [{
label: '三级 3-2-1',
class: 2
}]
}]
}],
defaultProps: {
children: 'children',
label: 'label'
}
|
1
2
3
4
5
6
7
8
9
10
11
12
13
14
15
16
17
18
19
20
21
22
23
24
25
26
27
28
29
30
31
32
33
34
35
36
37
38
39
40
41
42
43
44
45
46
47
48
49
50
51
52
53
54
55
56
57
| .tree-line{
.el-tree-node {
position: relative;
padding-left: 5px; // 缩进量
}
.el-tree-node__children {
padding-left: 5px; // 缩进量
}
// 竖线
.el-tree-node::before {
content: "";
height: 100%;
width: 1px;
position: absolute;
//left: -3px;
top: -18px;
border-width: 1px;
border-left: 1px solid #D1CECE;
}
// 当前层最后一个节点的竖线高度固定
.el-tree-node:last-child::before {
height: 38px; // 可以自己调节到合适数值
}
// 横线
.el-tree-node::after {
position: absolute;
content: " ";
width: 20px;
height: 20px;
//left: -3px;
top: 20px;
border-width: 1px;
border-top: 1px solid #D1CECE;
}
// 去掉最顶层的虚线,放最下面样式才不会被上面的覆盖了
& > .el-tree-node::after {
border-top: none;
}
& > .el-tree-node::before {
border-left: none;
}
// 展开关闭的icon修改
.el-tree-node__expand-icon.expanded {
-webkit-transform: rotate(0deg);
transform: rotate(0deg);
}
.el-icon-caret-right:before {
content: "\e783";
font-size: 15px;
font-family:element-icons !important;
}
.el-tree-node__expand-icon.expanded.el-icon-caret-right:before {
content: "\e781";
font-size: 15px;
font-family:element-icons !important;
}
}
|